Social Login
We have created this step by step installation guide to help you with the easy extension installation process. Follow our step by step process to install Magento 2 Social Login Extension in your online store.
With the assistance of our Magento 2 Social Login extension, the business owner can easily provide social network login options on their Magento stores for successfully complete checkout process. Our extension is easy to install and use for your requirements of providing direct social login options to your customers.
Installation Process
Manage Token
You can see package token on style Elightwalk by signing in to your account once you have completed the checkout process from Elightwalk. You can see using the following link Token
Command
composer require elightwalk/magento2-social-login
php bin/magento module:enable Elightwalk_Core Elightwalk_SocialLogin
php bin/magento module:enable Elightwalk_Core
php bin/magento setup:upgrade
php bin/magento setup:di:compile
php bin/magento setup:static-content:deploy
php bin/magento cache:clean
php bin/magento cache:flush
Configuration Path
Elightwalk > Social Login
Configuration
Social Login Module Enable

- Module Enable: You have to enable the module by setting it to “yes”, and then you will get all the functionalities of our Magento Social Login module.
- Default Customer Group: Select the customer group from here. (General, Retailer, Wholesale)
- Button Shape: From here you can select the shape of the social login button. (Round, Rectangle, Square)
- Button Shape Square:

- Button Shape Rectangle:

- Popup Dialog: Set the popup dialog to “Yes” or “No”.
- Button Position For Login Page: You can set the button position for the login page to “Above Customer Login Form” or “Below Customer Login Form”.
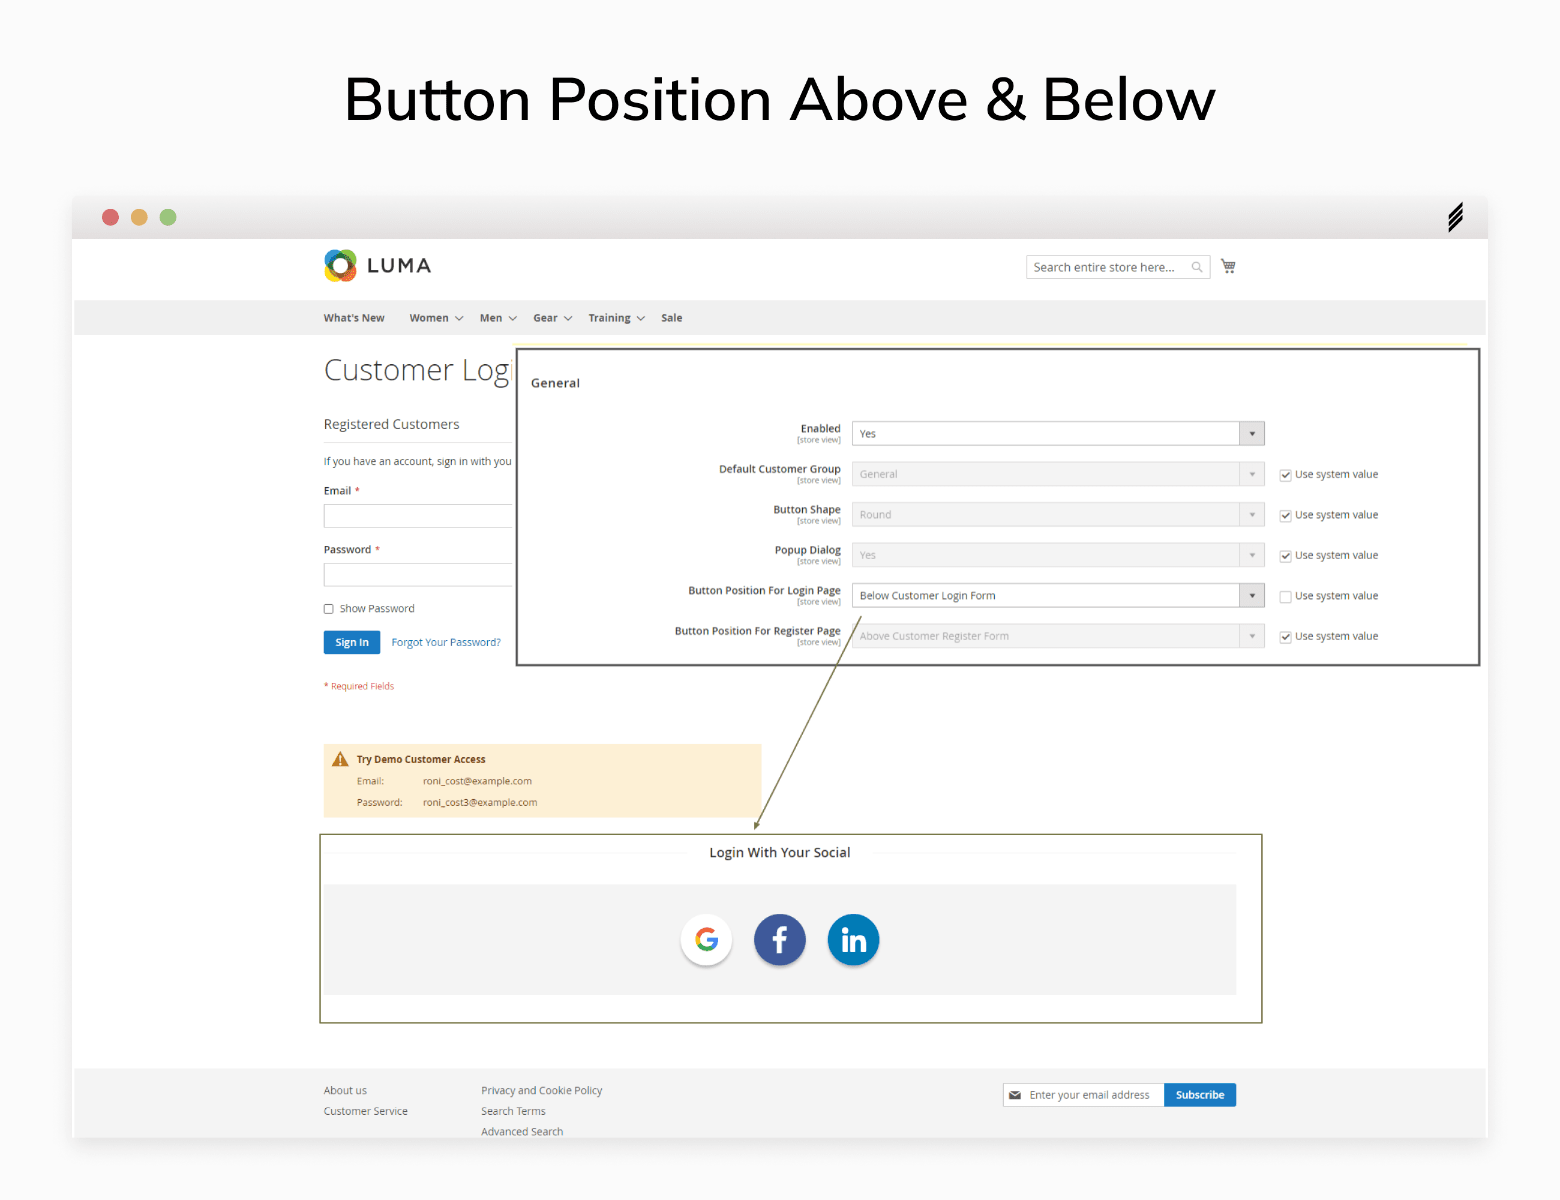
- Button Position For Register Page: You can set the button position for the register page to “Above Customer Register Form” or “Below Customer Register Form”.
- Login Page:
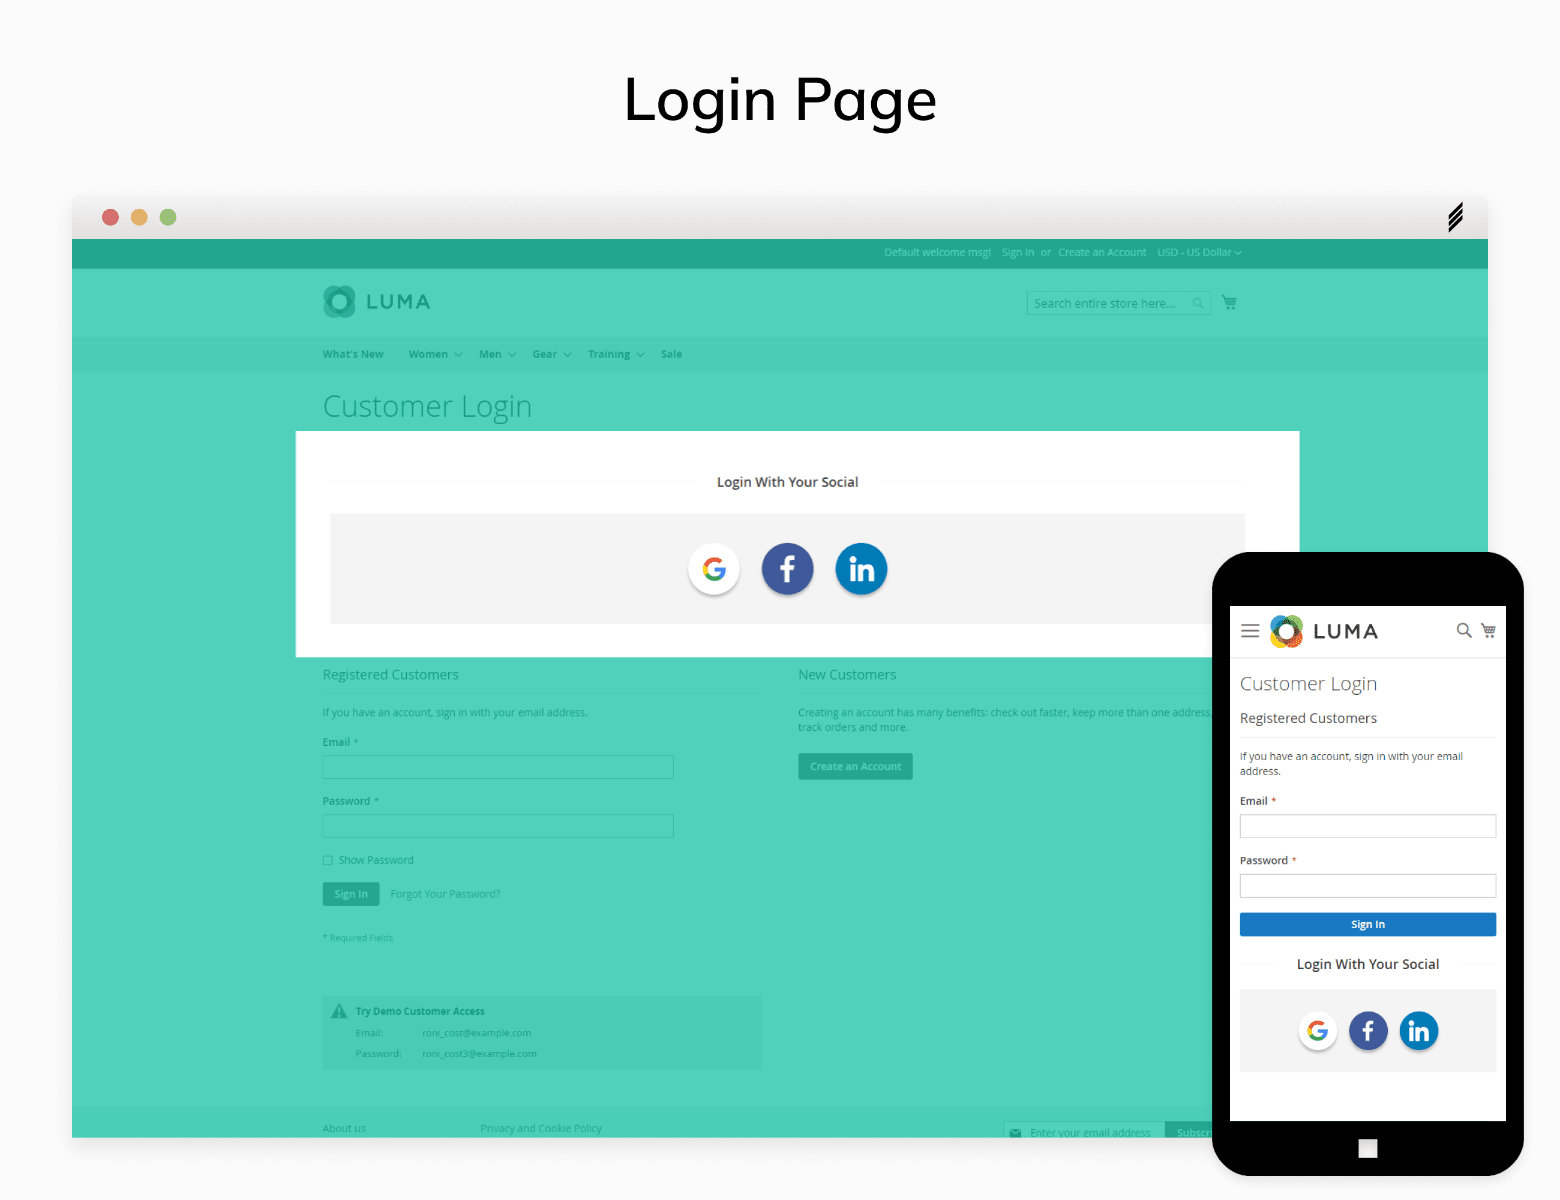
- The social login buttons on your Magento store can be observed in the above manner.
Google

- Enabled: Enable the Google social login button from here.
- Title: Give the title “Google” here.
- Client ID: Enter the client id here.
- Client Secret: Enter the client secret here.
- Redirect URL: Enter the redirecting url here.
- Popup Height & Width: Set the height and width of the popup from here.
- Sort Order: Give the sort order number here.
Google Client ID & Secret
Here’s how you can get client id and client secret for Google.
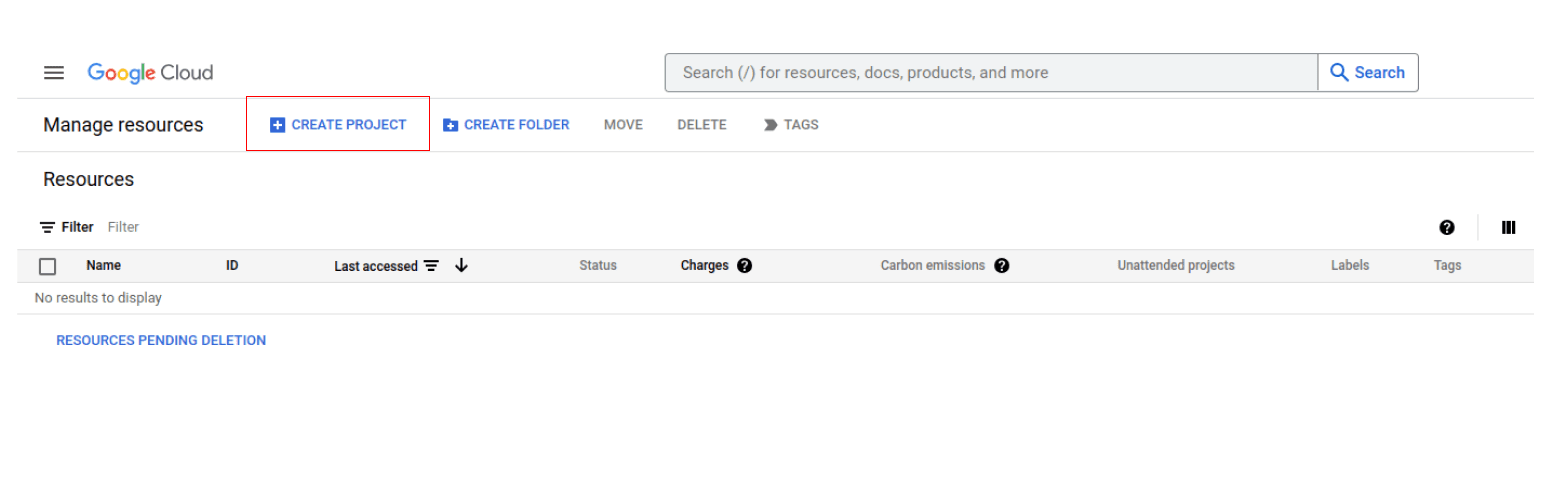
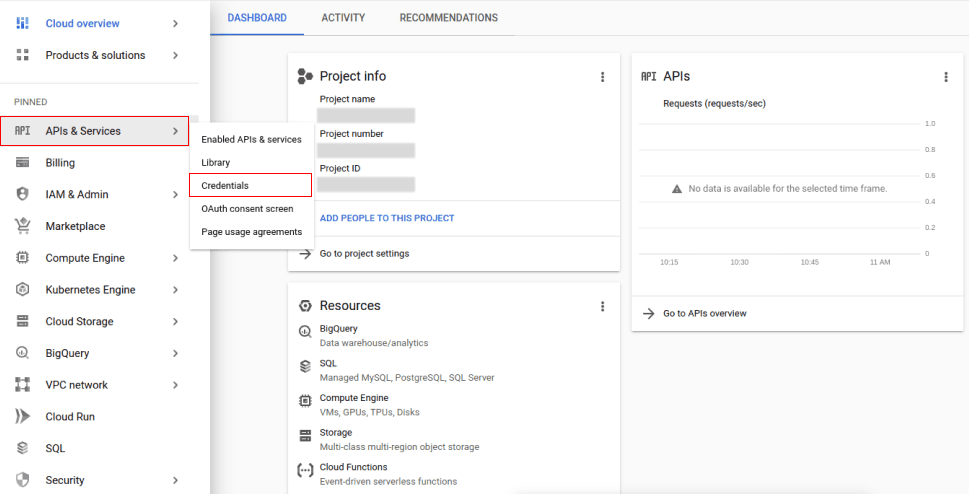
- To create google app, go to : Google Cloud
- Tap on the create project button and configure your app settings.
- Enter your new project name here and In certain instances, Google may request the user to provide further details regarding the organisation to which it should be associated with respect to a particular project. In this scenario, choose an organisation to which your G-suite account is associated. Next, proceed to select the CREATE button.

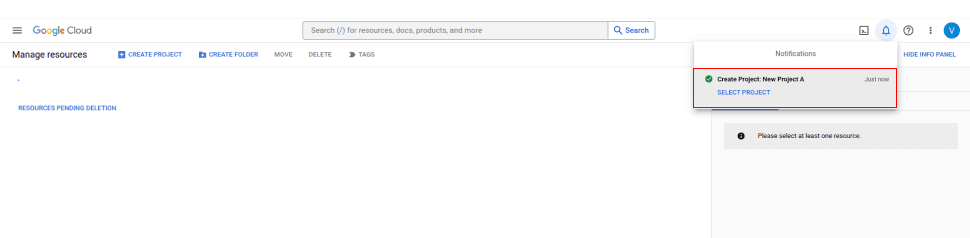
- Go to the Notification button at your right-hand side and here you will get a notification of a new project you’ve created click on that notification.
- Go to API & Services > Credentials.
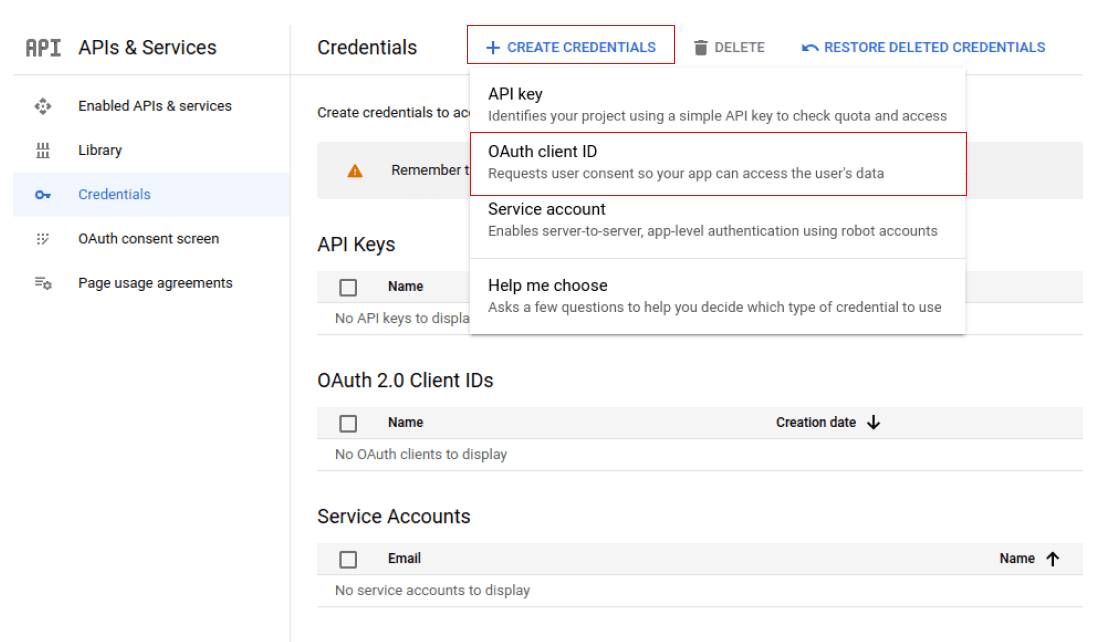
- You will get a display shown in the below screen. Here, you have to click on Create credentials > 0Auth client ID.
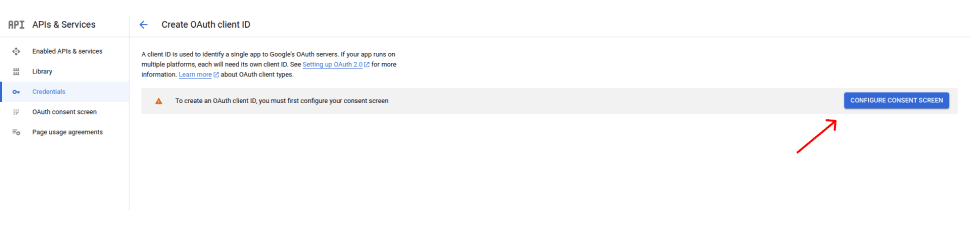
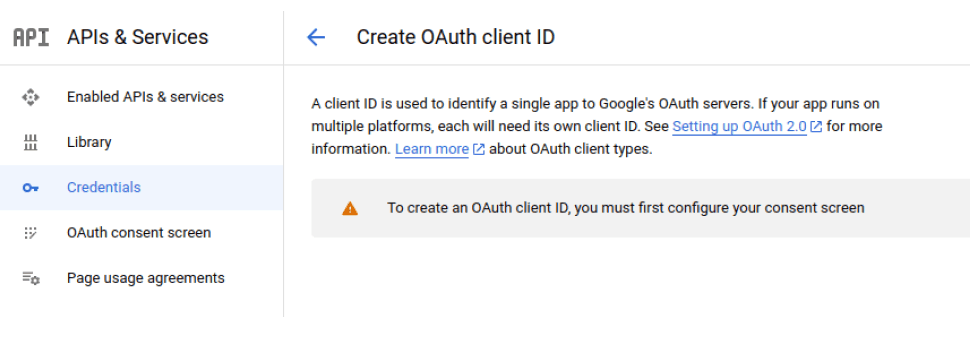
- If this is the first time you have created credentials for this project, Google will prompt you to set up a Consent Screen. This step is necessary because it allows you to configure the name of the extension and other information that a client will see when they consent to utilise social login in your business. Click on Configure consent screen.
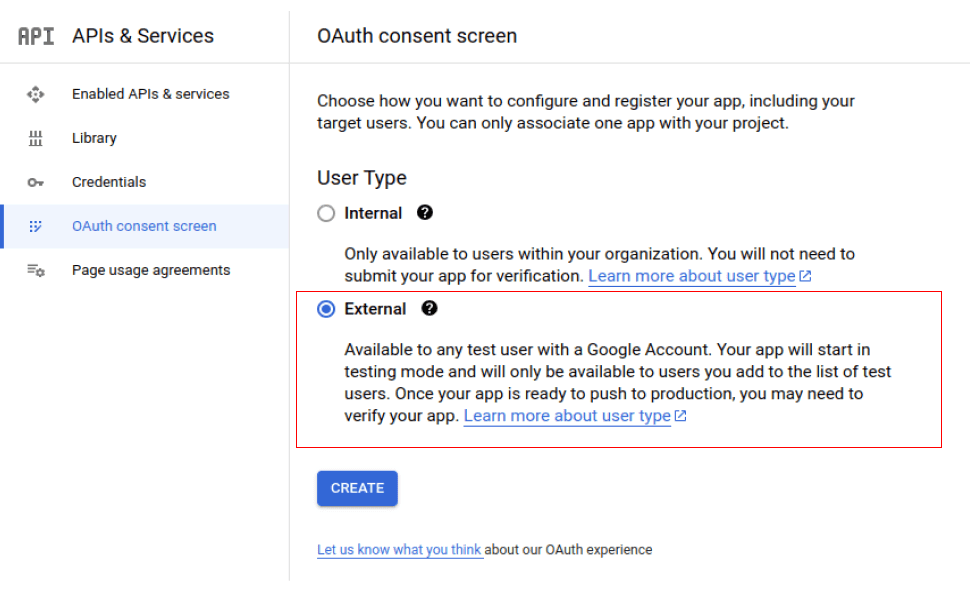
- In the first step, you have to choose whether the extension will be internal or external. As the goal of the Social Login M2 extension is to help customers sign in quickly, please choose the External choice, as shown in the screenshot below. Click on the "CREATE" button.
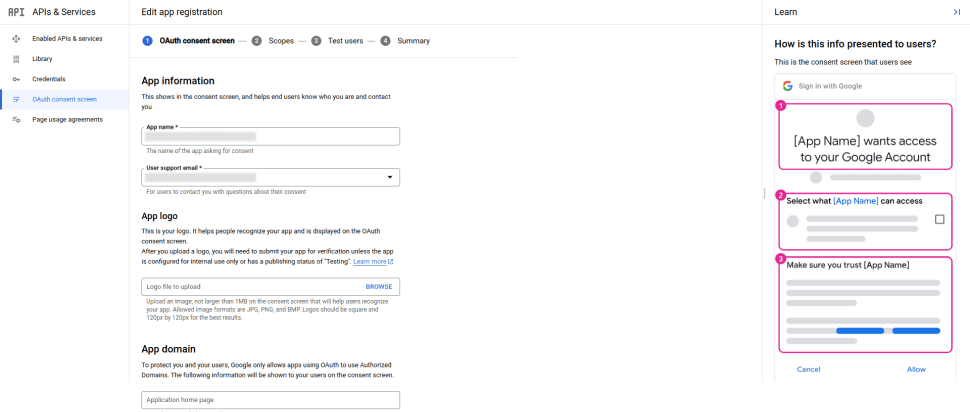
- You need to provide certain information about your store in the following phase, such as the App Name, App Icon, Support Contact Email, etc. Please refer to Google's advice on this page's left side for further details. Click on Save and continue.
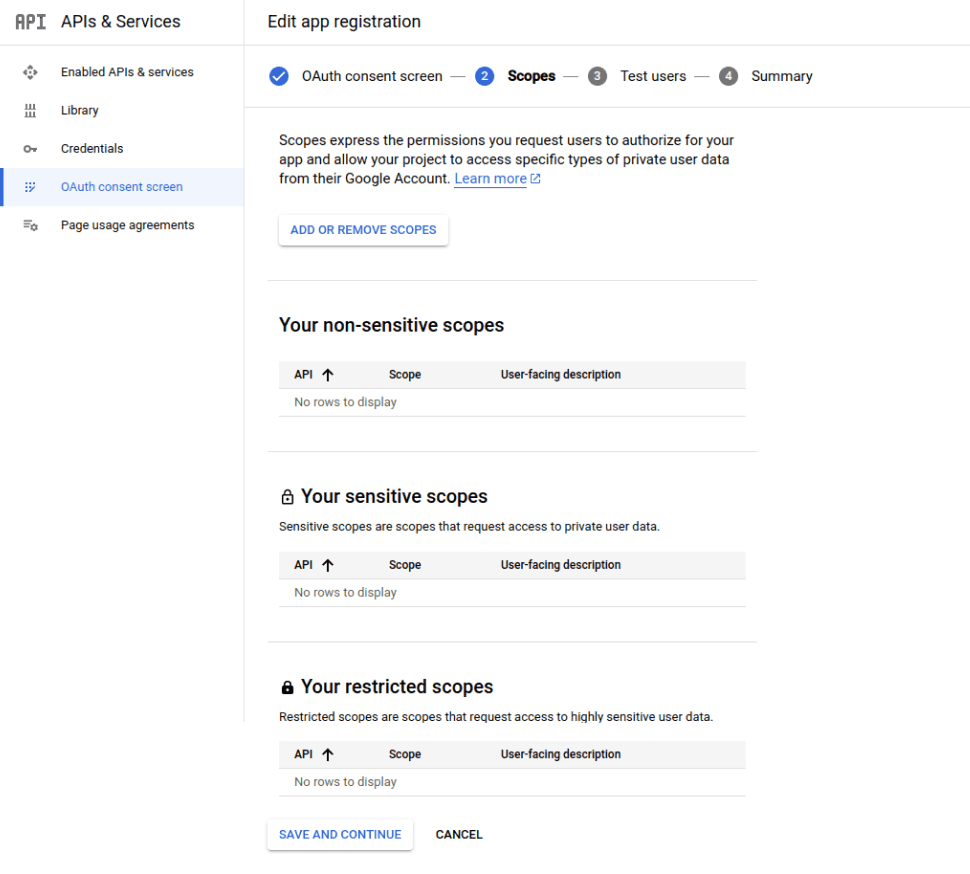
- To proceed, simply click the SAVE AND CONTINUE button in the SCOPE step. There are no credentials to add to the scopes because an OAuth Consent Screen is built at the very beginning of the project setup. A few steps later, you will create the required credentials, and they will be added to the scopes automatically.
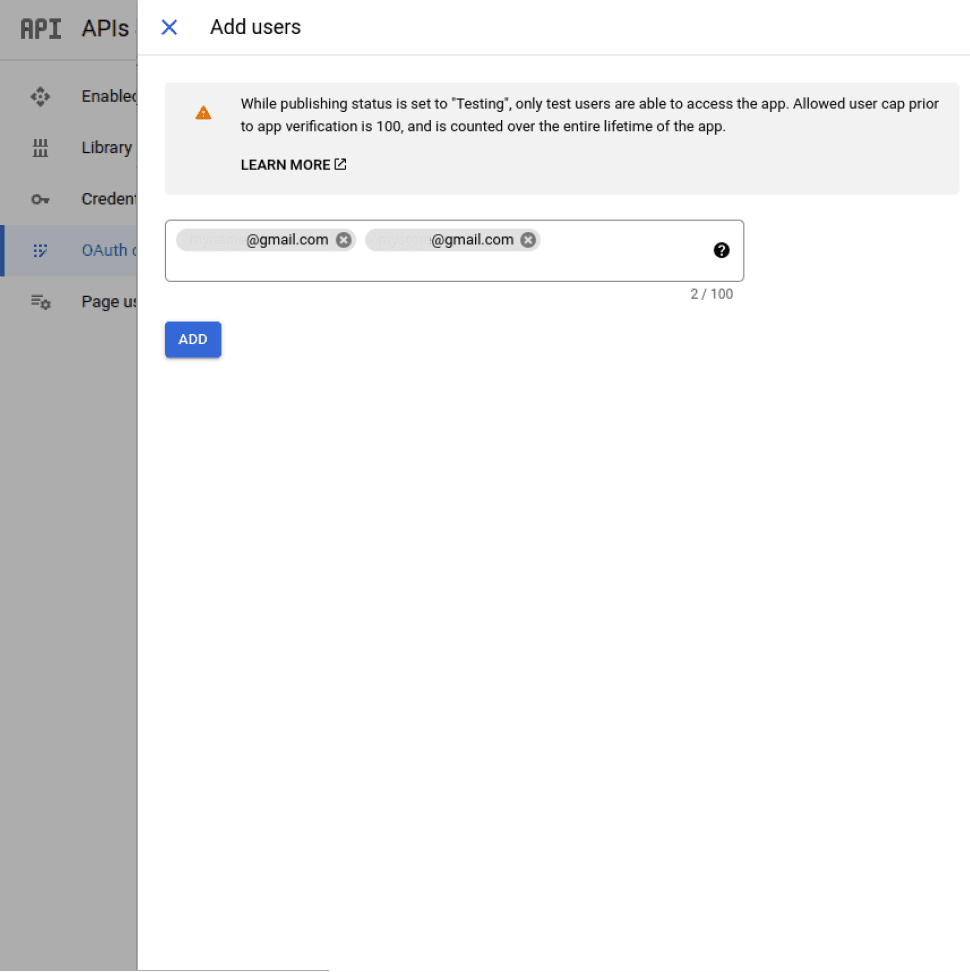
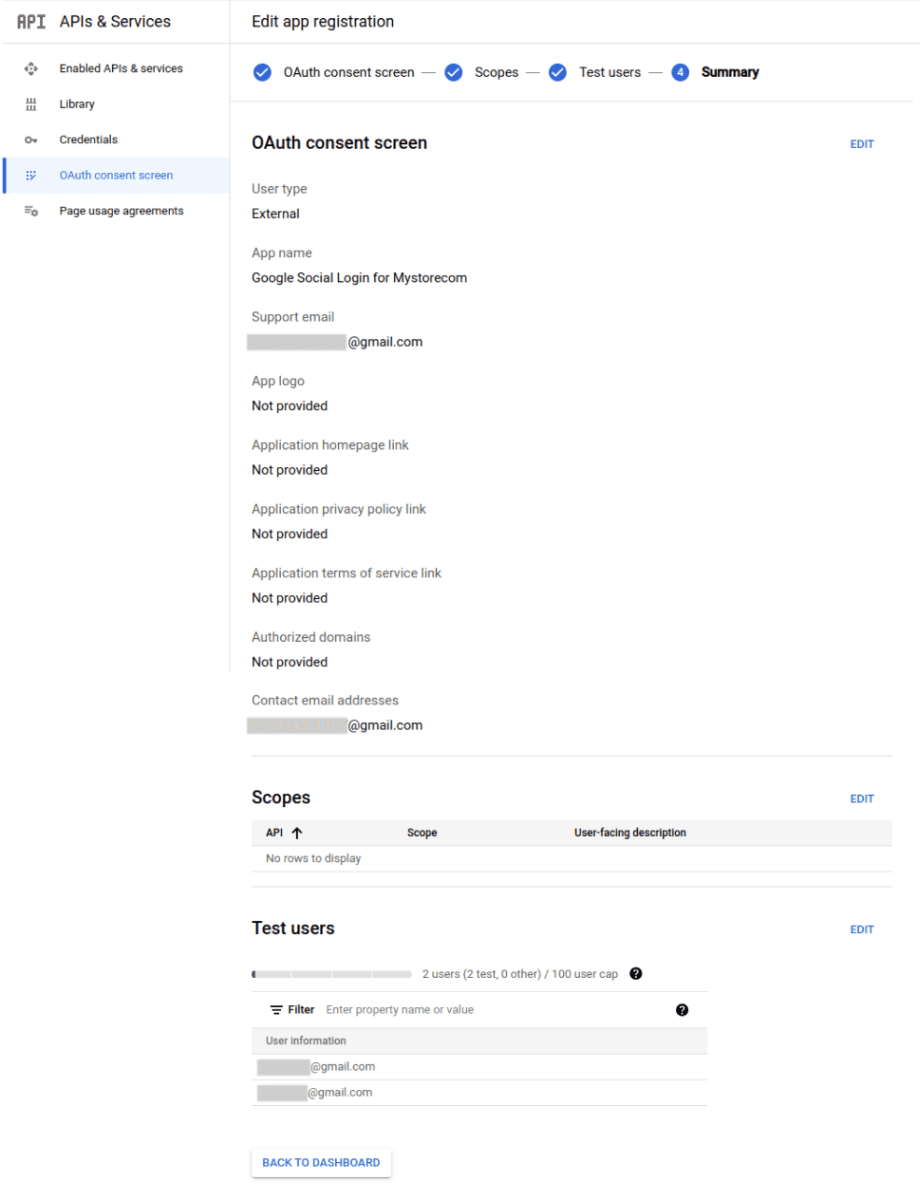
- In the third stage, you can add users who will be able to access your application while it is in test mode. Simply select the + ADD USERS button to bring up a menu where you may add new users. Then, a new window will immediately appear. Enter up to 100 email addresses of people who will have access to the app here. To add, use the plus sign. Then, select "Save and Continue."
- You can review the summary of your configurations in the third step. Now, press the "BACK TO DASHBOARD" button.
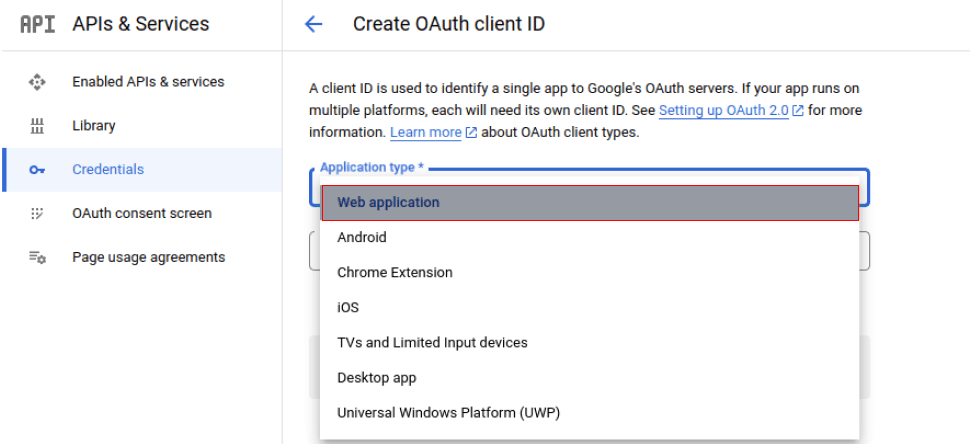
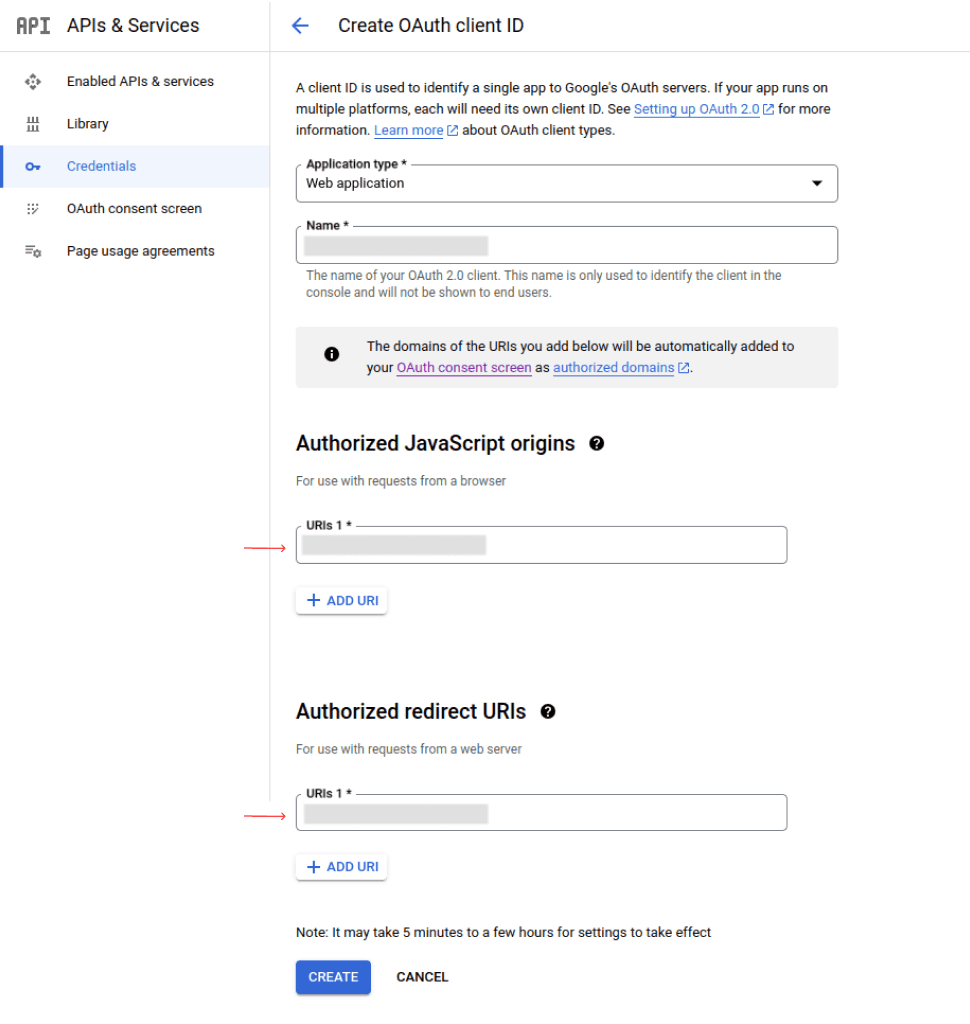
- Once the project dashboard has been displayed, navigate back to APIs and Services → Credentials and choose the + CREATE CREDENTIALS → OAuth Client ID option. You'll be sent to the OAuth Client ID Creation page this time. Please choose the type of Web Application to continue. Once the configuration is set to Web Application, supplementary fields will become visible.
- Please complete the necessary fields as specified by Google, and thereafter, proceed to click on the "CREATE" button.
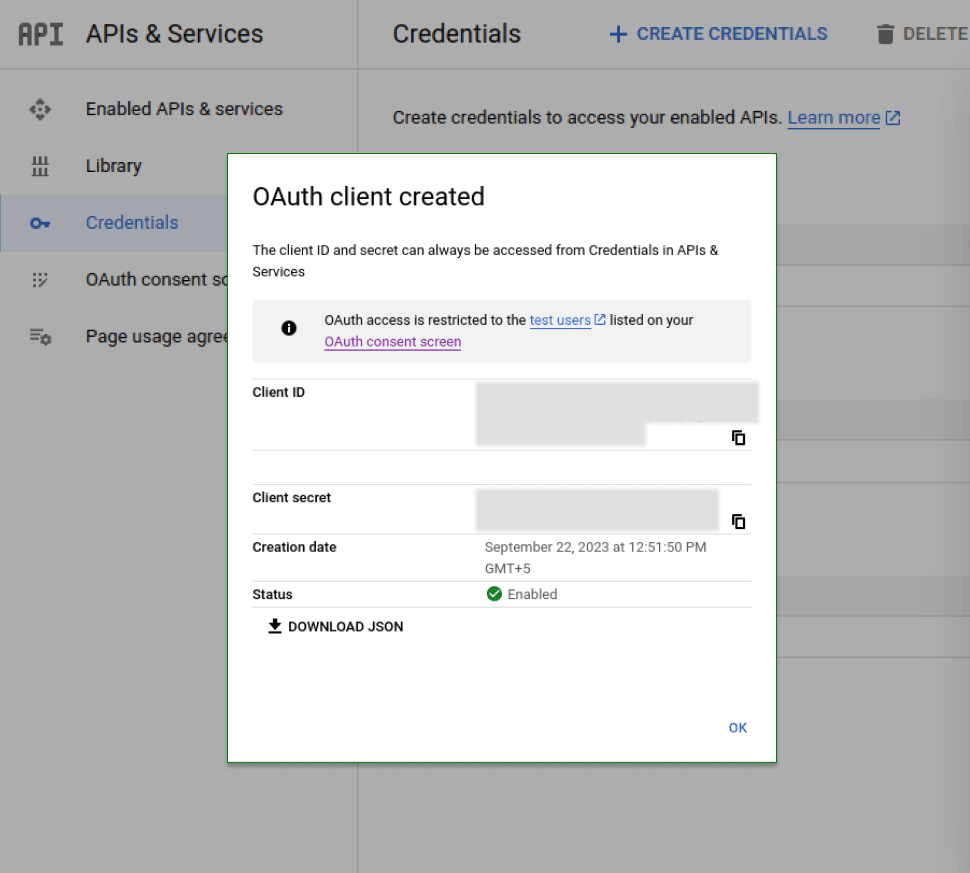
- Following the successful generation of OAuth Credentials, a pop-up window containing the Client Secret and Client ID will show up. To save the setup, please copy the Client ID and Client Secret, then enter your API KEY (Client ID) and API Secret (Client Secret) in the corresponding backend areas.
Facebook

- Enabled: Enable the Facebook social login button from here.
- Title: Give the title “Facebook” here.
- Application Api Key: Enter the application api key here.
- Application Secret: Enter the application secret here.
- Redirect URL: Enter the redirecting url here.
- Popup Height & Width: Set the height and width of the popup from here.
- Sort Order: Give the sort order number here.
Facebook Application Api Key & Secret
Here’s how you can get client id and client secret for Facebook.
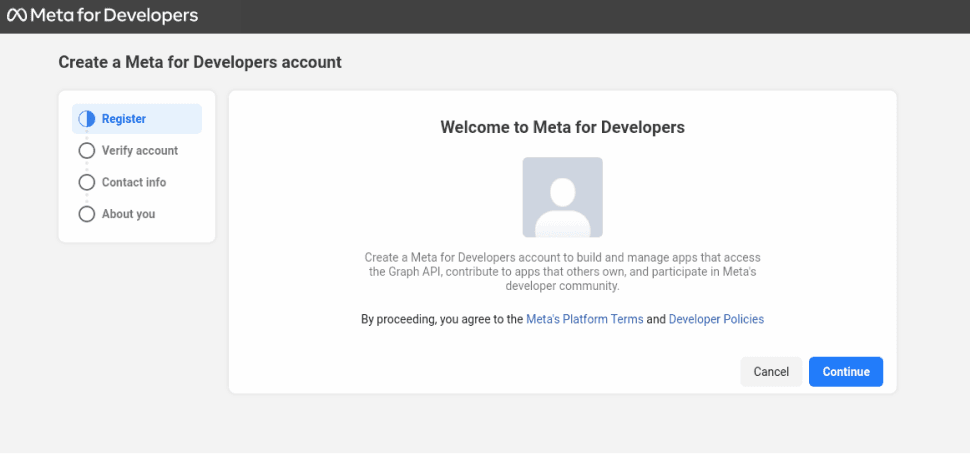
- Go to: Meta For Developers
- Then Go to : Facebook and register as a developer. Click on continue and complete the registration process by registering as a developer.
- After the successful registration, you will get the display shown below. Here you have to click on the Create App button.
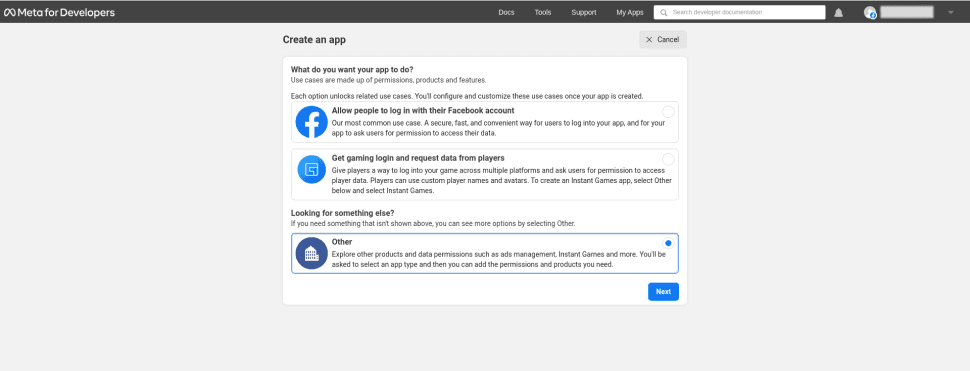
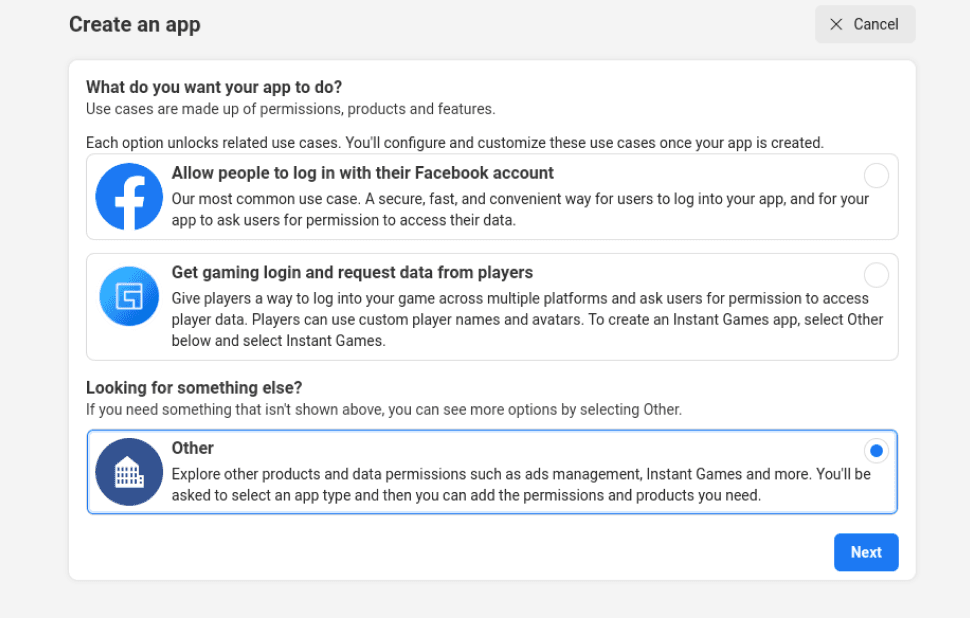
- When the following window appears, select "Other" and then click on the Next.
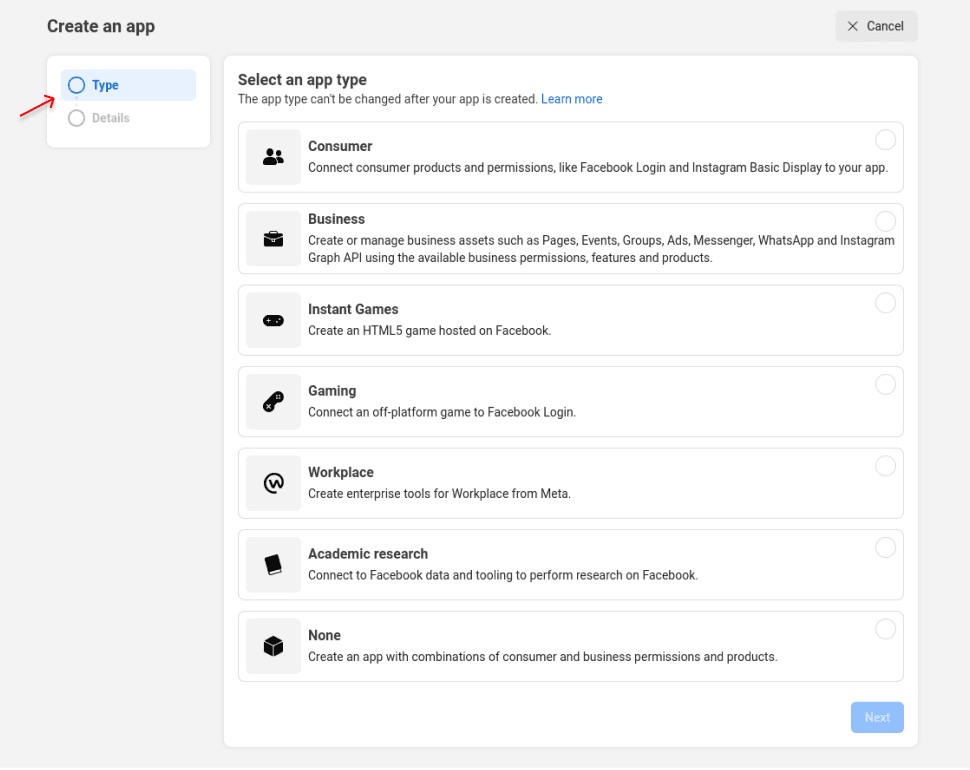
- Select "Consumer" as the application type and press Next.
- Please provide the name of the application, your contact email, and, if applicable, a Business Manager Account. The addition of a Business Manager Account is optional. Press Create App Button. (Facebook might ask you to enter your password for security reasons.)
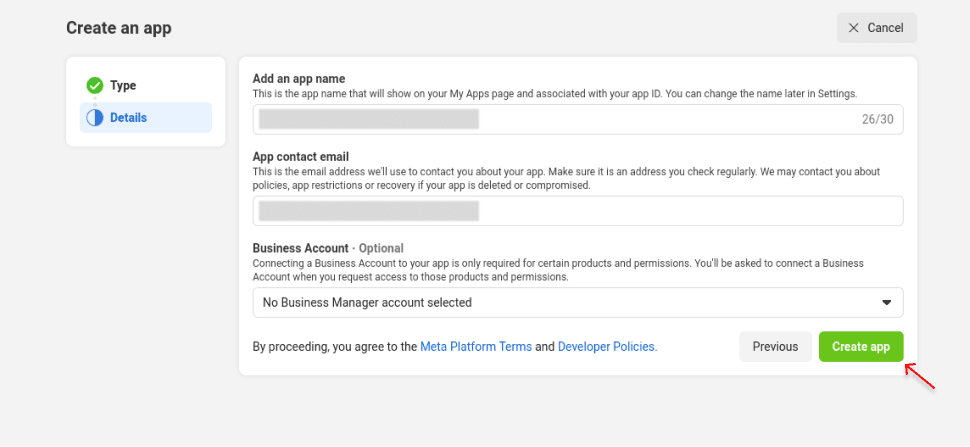
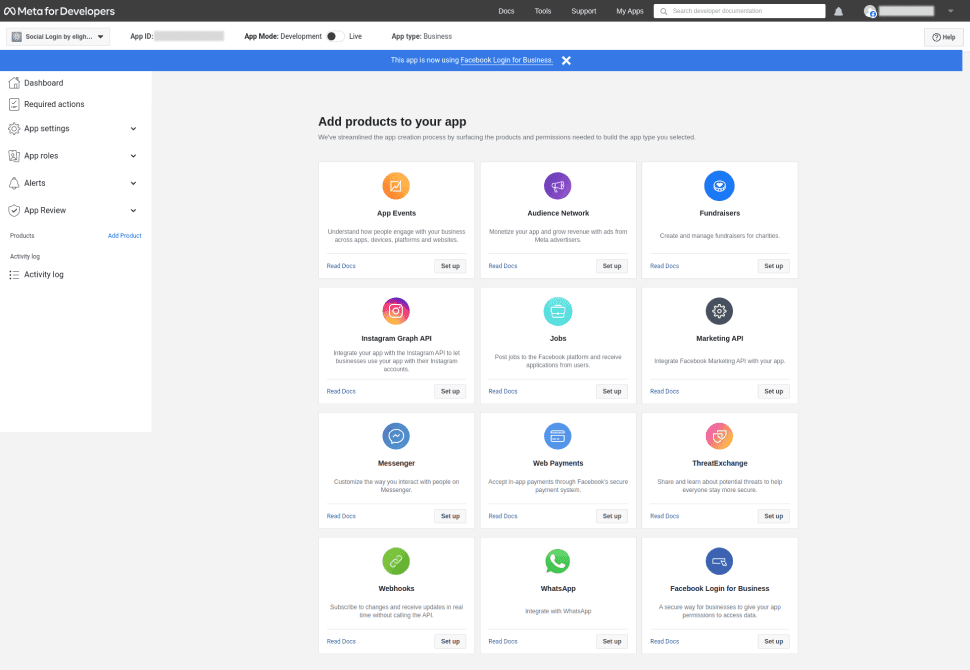
- To start, please click on the 'Set Up' button located on the Facebook Login for Business product card. Scroll down a bit if you are not getting the Facebook Login for Business product card.
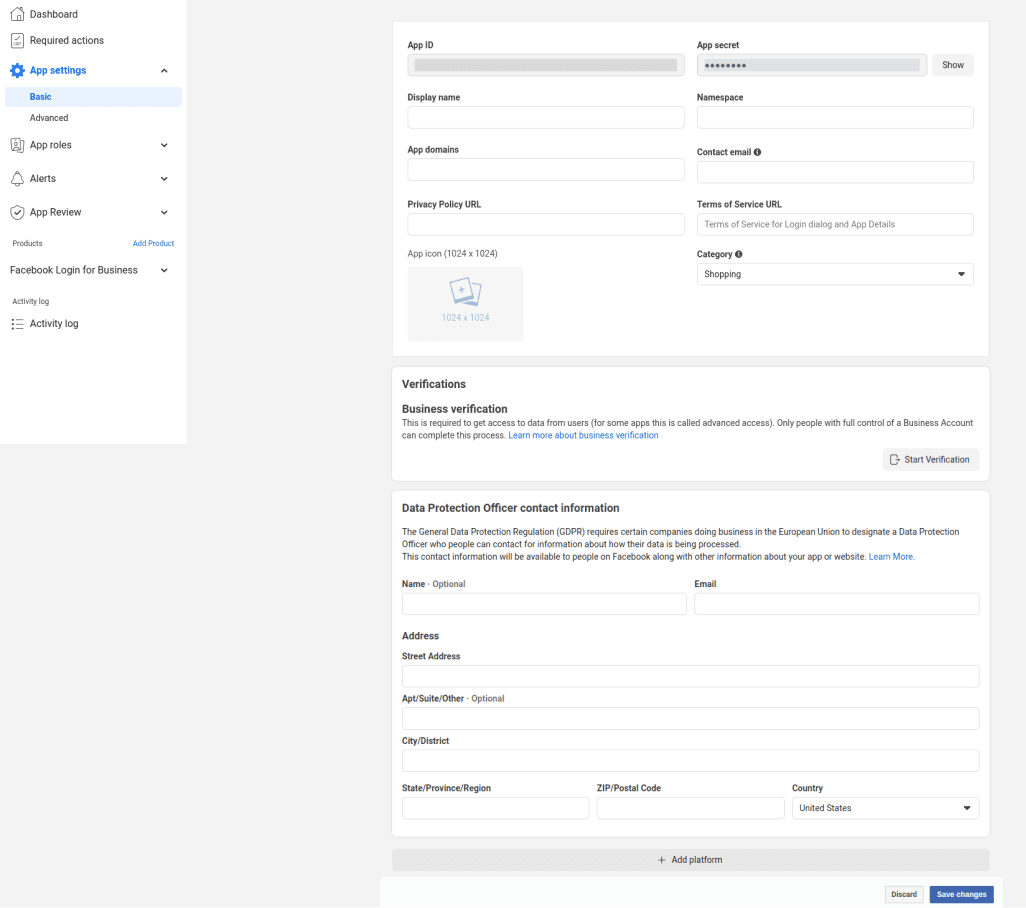
- Then select App Settings → Basic from the menu on the left, and enter the information in the appropriate fields.
- The generation of the App ID and App Secret will occur automatically. Please complete the App Domains form and select the appropriate app Category.
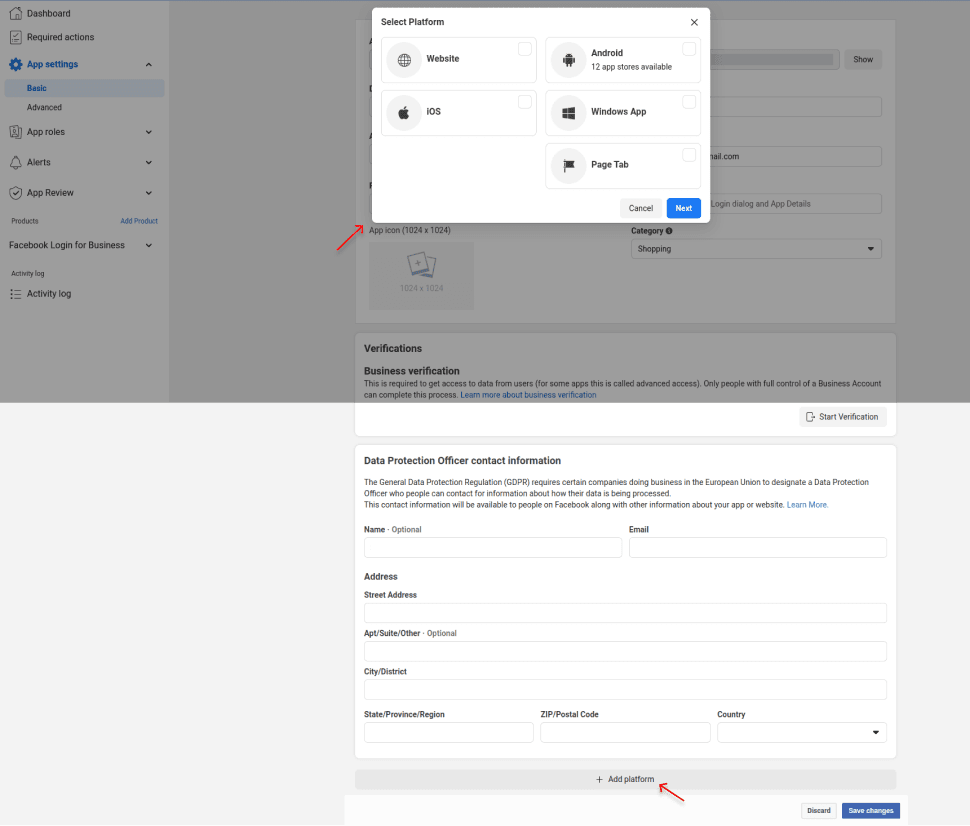
- While remaining in the 'Settings → Basic' section, scroll down and select the platform for your social apps by clicking on the Add Platform option.
Important Note:
Kindly ensure that the "User Data Deletion" field is configured.
As per the Facebook: Applications that access user data have to provide users the option to request the deletion of their data. This criteria can be met by your app by giving users the option to erase their data from your website or app or by sending them instructions on how to do so.
Facebook gives two ways to configure this:
- To specify data deletion callback url or
- To specify data deletion instruction url
(You can create a separate CMS page for the data deletion instruction url or else give the option to users to erase their data from your website/app.)
- You'll see a grid with different platform types after selecting the Add Platform button. Kindly choose the Website and click on Next.
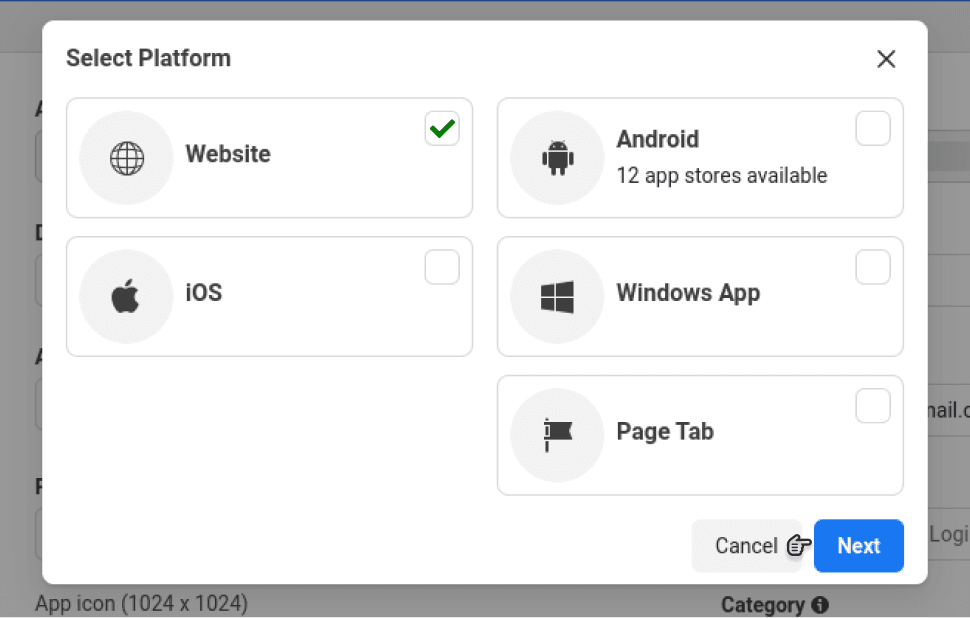
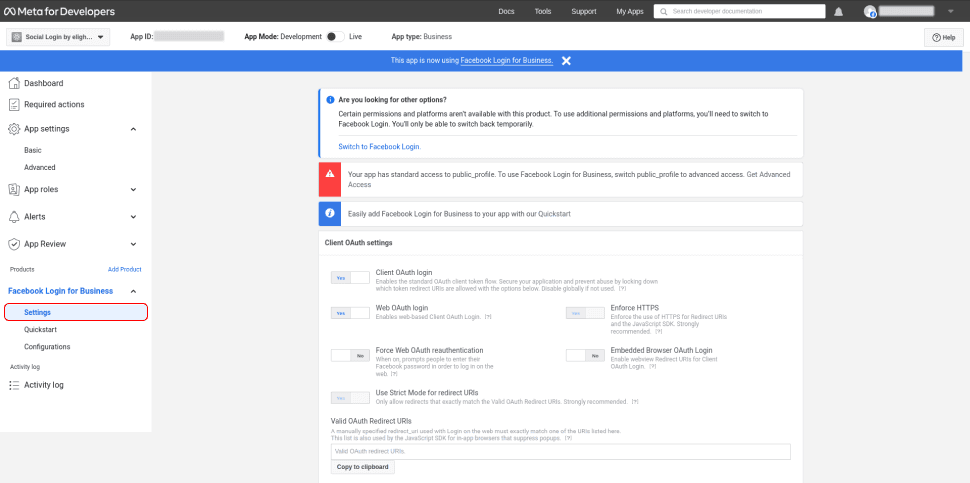
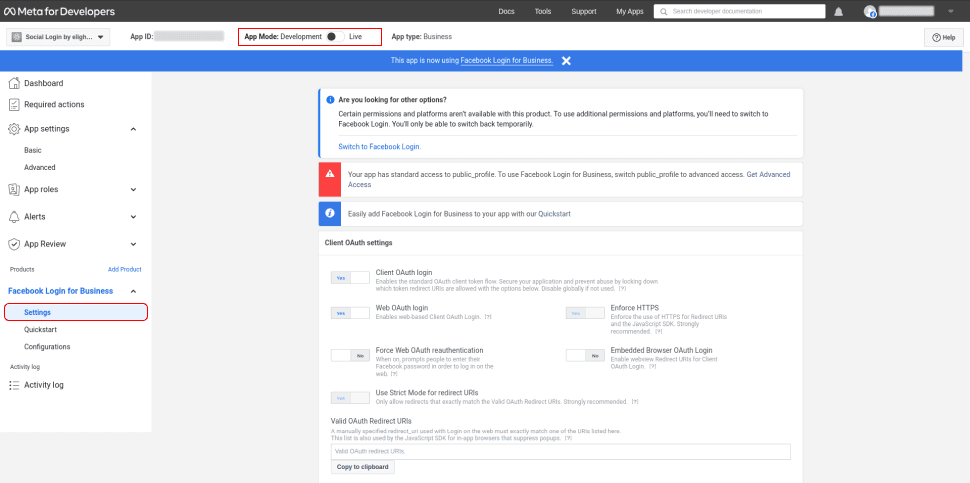
- Now you will get a popup that says “This app is now using Facebook Login for Business.
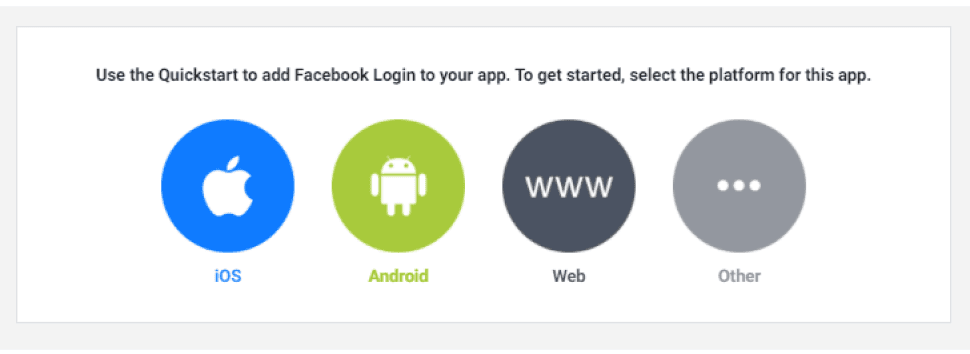
- If a platform is selected through the Quickstart options, it will appear as follows:
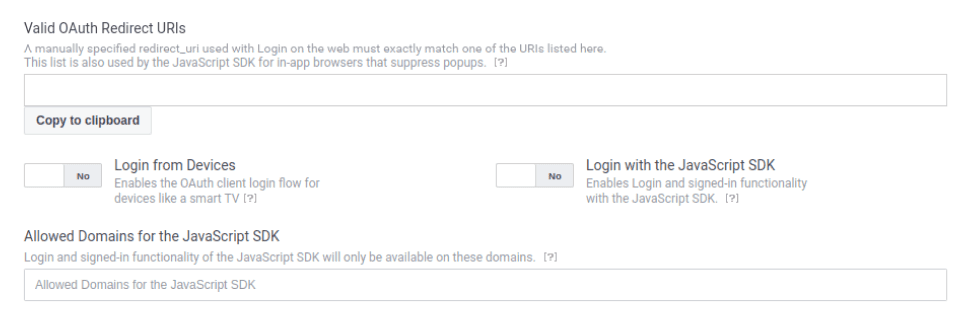
- On the Facebook Login → Settings tab, enable the Client OAuth Login and enter the Valid 0Auth redirect URLs.
- Now, on your left hand side go to Facebook Login for Business > Configurations. Now in the top center corner you will see the app mode change it from Development to Live.
 Now, go to the App Settings > Basic and you can see the App ID and App Secret.
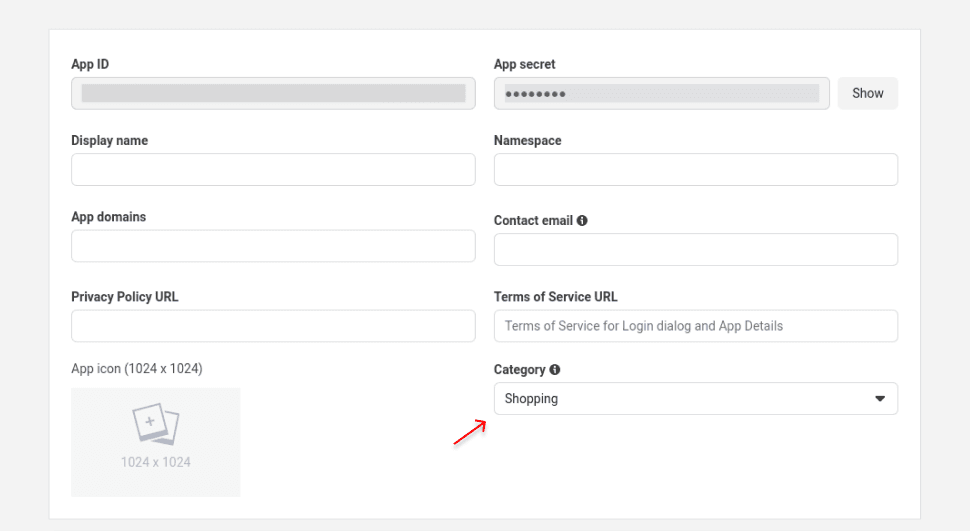
Linkedin

- Enabled: Enable the Linkedin social login button from here.
- Title: Give the title “Linkedin” here.
- Client ID: Enter the client id here.
- Client Secret: Enter the client secret here.
- Redirect URL: Enter the redirecting url here.
- Popup Height & Width: Set the height and width of the popup from here.
- Sort Order: Give the sort order number here.
Linkedin Client ID & Secret
Description
Elightwalk’s Social Login extension provides your customers with direct login to your store with social networks such as Google, Facebook and Linkedin.
It is easy to install and use with awesome social login features and functionalities.
This social login extension enables Google login, Facebook login and LinkedIn login for completing your checkout process. The feature of this Extension is shown in the below frontend pages.
- Customer login
- Customer Signup
- Checkout
Supporting Versions
Magento Version 2.4.5, 2.4.6
If you want to access the API or GraphQL, verify that the following configurations are set:
Go to "Elightwalk => Configuration => PWA => Enabled" and set it to "True."
Go to "Elightwalk => Configuration => PWA => Redirect Url (as you want) => Allow to Provider."
Add details of the provider and code.
After completing this step, you will get your customer authentication token.
LinkedIn API login
Step 1:
Call the store config API at {Magento_Base_Url}/rest/V1/store/storeConfigs to find the following information from the response:
- elightwalk_social_login_google_key
- elightwalk_social_login_facebook_key
- elightwalk_social_login_linkedin_key
You will get your social login key for every platform. Save it for the next step.
Step 2:
After getting your social login key, you have to open the URL in your browser and replace your Social Login Key.
- Replace SOCIALLOGIN_CLIENT_ID with elightwalk_social_login_linkedin_key
- Replace SOCIALLOGIN_REDIRECT_URL with the redirect URL (Google will return this URL).
https://www.linkedin.com/oauth/v2/authorization?response_type=code&client_id=SOCIALLOGIN_CLIENT_ID&redirect_uri=SOCIALLOGIN_REDIRECT_URL&state=foobar&scope=openid%20profile%20email
Find and copy your CODE from the redirect URL's "code" parameter.
Decode: Open the link “https://www.url-encode-decode.com/
” and decode your code here!
Step 3:
Fire the given link to the postman to test the social login API.
Link : baseurl/V2/elightwalk/sociallogin/login
Method : Post
Body :
Use a Decoded value of the code
"data": {
        "provider": "", // google, facebook, linkedin
        "code": "" // You will get code from the provider
    }
Add details of the provider and code.
After completing this step, you will get your customer authentication token.
Facebook API login
Step 1:
Call the store config API at {Magento_Base_Url}/rest/V1/store/storeConfigs to find the following information from the response:
- elightwalk_social_login_google_key
- elightwalk_social_login_facebook_key
- elightwalk_social_login_linkedin_key
You will get your social login key for every platform. Save it for the next step.
Step 2:
After getting your social login key, you have to open the URL in your browser and replace your Social Login Key.
- Replace SOCIALLOGIN_CLIENT_ID with elightwalk_social_login_facebook_key
- Replace SOCIALLOGIN_REDIRECT_URL with the redirect URL (Google will return this URL).
https://www.facebook.com/v17.0/dialog/oauth?client_id=SOCIALLOGIN_CLIENT_ID&redirect_uri=SOCIALLOGIN_REDIRECT_URL&state=${''}
Find and copy your CODE from the redirect URL's "code" parameter.
Decode: Open the link “https://www.url-encode-decode.com/
” and decode your code here!
Step 3:
Fire the given link to the postman to test the social login API.
Link : baseurl/V2/elightwalk/sociallogin/login
Method : Post
Body :
Use a Decoded value of the code
"data": {
        "provider": "", // google, facebook, linkedin
        "code": "" // You will get code from the provider
    }
Add details of the provider and code.
After completing this step, you will get your customer authentication token.
Google Graphql login
Step 1:
Call our StoreConfig Query with URL {Magento_Base_Url}/graphql
For example, if your Magento base URL is https://elightwalk.com, the complete endpoint would be:
https://elightwalk.com/graphql
query storeConfig{
  storeConfig{
    elightwalk_social_login_google_api_key
    elightwalk_social_login_facebook_api_key
    elightwalk_social_login_linkedin_api_key
  }
}
For every platform, you will get your social login key
Save it for the next step
Step 2:
After getting your social login key, you have to open the URL in your browser and replace your Social Login Key.
- Replace SOCIALLOGIN_CLIENT_ID with elightwalk_social_login_google_api_key
- Replace SOCIALLOGIN_REDIRECT_URL with the redirect URL (Google will return this URL).
https://accounts.google.com/o/oauth2/auth/oauthchooseaccount client_id=SOCIALLOGIN_CLIENT_ID&redirect_uri=SOCIALLOGIN_REDIRECT_URL&scope=email%20profile&state&include_granted_scopes=true&response_type=code&access_type=offline&prompt=select_account&service=lso&o2v=1&flowName=GeneralOAuthFlow
Find and copy your CODE from the redirect URL's "code" parameter.
Decode: Open the link “https://www.url-encode-decode.com/
” and decode your code here!
Step 3:
Call our elightwalkCreateSocialLogin Mutation.
Use a Decoded value of the code
  mutation elightwalkCreateSocialLogin{
    elightwalkCreateSocialLogin(input: {
      provider: "", // google, facebook, linkedin
      code: "" // You will get code from the provider
    })
  }
Add details of provider and code
After completing this step. You will get your customer authentication token.
LinkedIn Graphql login
Step 1:
Call our StoreConfig Query with URL {Magento_Base_Url}/graphql
For example, if your Magento base URL is https://elightwalk.com, the complete endpoint would be:
https://elightwalk.com/graphql
query storeConfig{
  storeConfig{
    elightwalk_social_login_google_api_key
    elightwalk_social_login_facebook_api_key
    elightwalk_social_login_linkedin_api_key
  }
}
For every platform, you will get your social login key
Save it for the next step
Step 2:
After getting your social login key, you have to open the URL in your browser and replace your Social Login Key.
- Replace SOCIALLOGIN_CLIENT_ID with elightwalk_social_login_linkedin_api_key
- Replace SOCIALLOGIN_REDIRECT_URL with the redirect URL (Google will return this URL).
https://www.linkedin.com/oauth/v2/authorization?response_type=code&client_id=SOCIALLOGIN_CLIENT_ID&redirect_uri=SOCIALLOGIN_REDIRECT_URL&state=foobar&scope=openid%20profile%20email
Find and copy your CODE from the redirect URL's "code" parameter.
Decode: Open the link “https://www.url-encode-decode.com/
” and decode your code here!
Step 3:
Call our elightwalkCreateSocialLogin Mutation.
Use a Decoded value of the code
  mutation elightwalkCreateSocialLogin{
    elightwalkCreateSocialLogin(input: {
      provider: "", // google, facebook, linkedin
      code: "" // You will get code from the provider
    })
  }
Add details of the provider and code.
After completing this step, you will get your customer authentication token.
Facebook Graphql login
Step 1:
Call our StoreConfig Query with URL {Magento_Base_Url}/graphql
For example, if your Magento base URL is https://elightwalk.com, the complete endpoint would be:
https://elightwalk.com/graphql
query storeConfig{
  storeConfig{
    elightwalk_social_login_google_api_key
    elightwalk_social_login_facebook_api_key
    elightwalk_social_login_linkedin_api_key
  }
}
For every platform, you will get your social login key
Save it for the next step
Step 2:
After getting your social login key, you have to open the URL in your browser and replace your Social Login Key.
- Replace SOCIALLOGIN_CLIENT_ID with elightwalk_social_login_facebook_api_key
- Replace SOCIALLOGIN_REDIRECT_URL with the redirect URL (Google will return this URL).
https://www.facebook.com/v17.0/dialog/oauth?client_id=SOCIALLOGIN_CLIENT_ID&redirect_uri=SOCIALLOGIN_REDIRECT_URL&state=${''}
Find and copy your CODE from the redirect URL's "code" parameter.
Decode: Open the link “https://www.url-encode-decode.com/
” and decode your code here!
Step 3:
Call our elightwalkCreateSocialLogin Mutation.
Use a Decoded value of the code
  mutation elightwalkCreateSocialLogin{
    elightwalkCreateSocialLogin(input: {
      provider: "", // google, facebook, linkedin
      code: "" // You will get code from the provider
    })
  }
Add details of the provider and code.
After completing this step, you will get your customer authentication token.
Change Log
Version: 1.0.3
- Click on the provider, then open the popup. The customer closes the popup and then again opens the popup issue.
Version: 1.0.2
- Fixed Customer id = null issue
Version: 1.0.1
- Compatible with Magento version 2.4.6
- Fixed ACL issue.
- Logger Implementation.
Version: 1.0.0
- Compatible with Magento version 2.4.5
- Social Login supports Google, Facebook, and LinkedIn.
- Graphql, RestApi Implementation.
- Implement Composer.

Social Login
We have created this step by step installation guide to help you with the easy extension installation process. Follow our step by step process to install Magento 2 Social Login Extension in your online store.
With the assistance of our Magento 2 Social Login extension, the business owner can easily provide social network login options on their Magento stores for successfully complete checkout process. Our extension is easy to install and use for your requirements of providing direct social login options to your customers.
Installation Process
Manage Token
You can see package token on style Elightwalk by signing in to your account once you have completed the checkout process from Elightwalk. You can see using the following link Token
Command
Configuration Path
Elightwalk > Social Login
Configuration
Social Login Module Enable
Google
Google Client ID & Secret
Here’s how you can get client id and client secret for Google.
Facebook
Facebook Application Api Key & Secret
Here’s how you can get client id and client secret for Facebook.
Important Note:
Kindly ensure that the "User Data Deletion" field is configured.
As per the Facebook: Applications that access user data have to provide users the option to request the deletion of their data. This criteria can be met by your app by giving users the option to erase their data from your website or app or by sending them instructions on how to do so.
Facebook gives two ways to configure this:
(You can create a separate CMS page for the data deletion instruction url or else give the option to users to erase their data from your website/app.)
Linkedin
Linkedin Client ID & Secret
Here’s how you can get client id and client secret for Linkedin.
Description
Elightwalk’s Social Login extension provides your customers with direct login to your store with social networks such as Google, Facebook and Linkedin.
It is easy to install and use with awesome social login features and functionalities.
This social login extension enables Google login, Facebook login and LinkedIn login for completing your checkout process. The feature of this Extension is shown in the below frontend pages.
Supporting Versions
Magento Version 2.4.5, 2.4.6
If you want to access the API or GraphQL, verify that the following configurations are set:
Go to "Elightwalk => Configuration => PWA => Enabled" and set it to "True."
Go to "Elightwalk => Configuration => PWA => Redirect Url (as you want) => Allow to Provider."
Google API Login
Step 1:
Call the store config API at {Magento_Base_Url}/rest/V1/store/storeConfigs to find the following information from the response:
For every platform, you will get your social login key. Save it for the next step.
Step 2:
After getting your social login key, you have to open the URL in your browser and replace your Social Login Key.
- Replace SOCIALLOGIN_CLIENT_ID with elightwalk_social_login_google_key
- Replace SOCIALLOGIN_REDIRECT_URL with the redirect URL (Google will return this URL).
https://accounts.google.com/o/oauth2/auth/oauthchooseaccount client_id=SOCIALLOGIN_CLIENT_ID&redirect_uri=SOCIALLOGIN_REDIRECT_URL&scope=email%20profile&state&include_granted_scopes=true&response_type=code&access_type=offline&prompt=select_account&service=lso&o2v=1&flowName=GeneralOAuthFlowFind and copy your CODE from the redirect URL's "code" parameter.
Decode: Open the link “https://www.url-encode-decode.com/ ” and decode your code here!
Step 3:
Fire the given link to the postman to test the social login API.
Link : baseurl/V2/elightwalk/sociallogin/login
Method : Post
Body :Use a Decoded value of the code
Add details of the provider and code.
After completing this step, you will get your customer authentication token.
LinkedIn API login
Step 1:
Call the store config API at {Magento_Base_Url}/rest/V1/store/storeConfigs to find the following information from the response:
You will get your social login key for every platform. Save it for the next step.
Step 2:
After getting your social login key, you have to open the URL in your browser and replace your Social Login Key.
- Replace SOCIALLOGIN_CLIENT_ID with elightwalk_social_login_linkedin_key
- Replace SOCIALLOGIN_REDIRECT_URL with the redirect URL (Google will return this URL).
https://www.linkedin.com/oauth/v2/authorization?response_type=code&client_id=SOCIALLOGIN_CLIENT_ID&redirect_uri=SOCIALLOGIN_REDIRECT_URL&state=foobar&scope=openid%20profile%20emailFind and copy your CODE from the redirect URL's "code" parameter.
Decode: Open the link “https://www.url-encode-decode.com/ ” and decode your code here!
Step 3:
Fire the given link to the postman to test the social login API.
Link : baseurl/V2/elightwalk/sociallogin/login
Method : Post
Body :Use a Decoded value of the code
Add details of the provider and code.
After completing this step, you will get your customer authentication token.
Facebook API login
Step 1:
Call the store config API at {Magento_Base_Url}/rest/V1/store/storeConfigs to find the following information from the response:
You will get your social login key for every platform. Save it for the next step.
Step 2:
After getting your social login key, you have to open the URL in your browser and replace your Social Login Key.
- Replace SOCIALLOGIN_CLIENT_ID with elightwalk_social_login_facebook_key
- Replace SOCIALLOGIN_REDIRECT_URL with the redirect URL (Google will return this URL).
https://www.facebook.com/v17.0/dialog/oauth?client_id=SOCIALLOGIN_CLIENT_ID&redirect_uri=SOCIALLOGIN_REDIRECT_URL&state=${''}Find and copy your CODE from the redirect URL's "code" parameter.
Decode: Open the link “https://www.url-encode-decode.com/ ” and decode your code here!
Step 3:
Fire the given link to the postman to test the social login API.
Link : baseurl/V2/elightwalk/sociallogin/login
Method : Post
Body :Use a Decoded value of the code
Add details of the provider and code.
After completing this step, you will get your customer authentication token.
Google Graphql login
Step 1:
Call our StoreConfig Query with URL {Magento_Base_Url}/graphql
For example, if your Magento base URL is https://elightwalk.com, the complete endpoint would be:
https://elightwalk.com/graphql
For every platform, you will get your social login key
Save it for the next step
Step 2:
After getting your social login key, you have to open the URL in your browser and replace your Social Login Key.
- Replace SOCIALLOGIN_CLIENT_ID with elightwalk_social_login_google_api_key
- Replace SOCIALLOGIN_REDIRECT_URL with the redirect URL (Google will return this URL).
https://accounts.google.com/o/oauth2/auth/oauthchooseaccount client_id=SOCIALLOGIN_CLIENT_ID&redirect_uri=SOCIALLOGIN_REDIRECT_URL&scope=email%20profile&state&include_granted_scopes=true&response_type=code&access_type=offline&prompt=select_account&service=lso&o2v=1&flowName=GeneralOAuthFlowFind and copy your CODE from the redirect URL's "code" parameter.
Decode: Open the link “https://www.url-encode-decode.com/ ” and decode your code here!
Step 3:
Call our elightwalkCreateSocialLogin Mutation.
Use a Decoded value of the code
Add details of provider and code
After completing this step. You will get your customer authentication token.
LinkedIn Graphql login
Step 1:
Call our StoreConfig Query with URL {Magento_Base_Url}/graphql
For example, if your Magento base URL is https://elightwalk.com, the complete endpoint would be:
https://elightwalk.com/graphql
For every platform, you will get your social login key
Save it for the next step
Step 2:
After getting your social login key, you have to open the URL in your browser and replace your Social Login Key.
- Replace SOCIALLOGIN_CLIENT_ID with elightwalk_social_login_linkedin_api_key
- Replace SOCIALLOGIN_REDIRECT_URL with the redirect URL (Google will return this URL).
https://www.linkedin.com/oauth/v2/authorization?response_type=code&client_id=SOCIALLOGIN_CLIENT_ID&redirect_uri=SOCIALLOGIN_REDIRECT_URL&state=foobar&scope=openid%20profile%20emailFind and copy your CODE from the redirect URL's "code" parameter.
Decode: Open the link “https://www.url-encode-decode.com/ ” and decode your code here!
Step 3:
Call our elightwalkCreateSocialLogin Mutation.
Use a Decoded value of the code
Add details of the provider and code.
After completing this step, you will get your customer authentication token.
Facebook Graphql login
Step 1:
Call our StoreConfig Query with URL {Magento_Base_Url}/graphql
For example, if your Magento base URL is https://elightwalk.com, the complete endpoint would be:
https://elightwalk.com/graphql
For every platform, you will get your social login key
Save it for the next step
Step 2:
After getting your social login key, you have to open the URL in your browser and replace your Social Login Key.
- Replace SOCIALLOGIN_CLIENT_ID with elightwalk_social_login_facebook_api_key
- Replace SOCIALLOGIN_REDIRECT_URL with the redirect URL (Google will return this URL).
https://www.facebook.com/v17.0/dialog/oauth?client_id=SOCIALLOGIN_CLIENT_ID&redirect_uri=SOCIALLOGIN_REDIRECT_URL&state=${''}Find and copy your CODE from the redirect URL's "code" parameter.
Decode: Open the link “https://www.url-encode-decode.com/ ” and decode your code here!
Step 3:
Call our elightwalkCreateSocialLogin Mutation.
Use a Decoded value of the code
Add details of the provider and code.
After completing this step, you will get your customer authentication token.
Change Log
- Click on the provider, then open the popup. The customer closes the popup and then again opens the popup issue.
Version: 1.0.2- Fixed Customer id = null issue
Version: 1.0.1- Compatible with Magento version 2.4.6
- Fixed ACL issue.
- Logger Implementation.
Version: 1.0.0